
Installing Arch Linux on a MacBook Pro
For anyone interested in getting Arch Linux on their MacBook Pro, a simple Google search will come up with many guides, Q&As, blog posts, and wiki entries. My intention in writing this is not to add more noise to this cacophony of advice or to reinvent the wheel. It’s just that in the process of getting a distro of GNU/Linux up on my machine in a way that works for me, I had to deviate a bit from the other recommendations out there. This entry is as much for myself—when the day comes that by necessity or by whim I need to install Arch again—as it is for anyone else curious about taking on such a task.
Why Arch?
Perhaps in another post where I have more room and time I will get into all the reasons for installing GNU/Linux on my MacBook. As to why Arch Linux: Although I’ve been content with Mac OS X over the years, every so often I would install a Linux distribution to see the state of free/libre OSes. This began with Ubuntu 8.04 back in 2008. I mostly stuck with Ubuntu since then when I wanted to play around with Linux. Last year I gave Fedora a try, as well as Linux Mint. Linux Mint seemed to provide the best Mac hardware support to date, but there were a few packages I rely on that were too out of date in Linux Mint’s Ubuntu 14.04 base, and I didn’t want to deal with a bunch of manual .deb package installs or PPAs that were often out of date, too. A few months prior I had gotten a cheap little HP Mini Stream PC to use at my school office. I got Arch up and running on that no problem, and I really liked the rolling release cycle of packages that kept everything nice and fresh. And the Arch User Repository (AUR) was great at providing pretty much everything I could need or want. So, I decided to give Arch a try on my MacBook. I loved it … mostly. There’s a few annoyances, but I’ve since shrunk my OS X partition down to just a failsafe. I’m using Arch on it full time now.
Why Cinnamon?
Like the topic of GNU/Linux distros, I could spend an entire post talking about why I settled on Cinnamon. I really like the customization of Xfce, but no matter how much I tweak it, it just seems a little outdated to me. It’s purely personal preference, but I feel Cinnamon just has a little more polish on it, but it’s still very much customizable. It has many of the desktop and window management features of OS X that I liked but none of the ones that have begun to annoy since OS X 10.9.
So, this guide is going to install Cinnamon as it’s desktop environment. The great thing about Arch, though, is you’re free to switch to any other environment pretty easily. I’ve used Xfce and GNOME on Arch just fine.
Get on with It!
OK, so installing Arch. I relied on three other Arch-on-MacBook guides to help me through the process:
- The MacBook and MacBookPro11,x Arch Linux wiki pages. (All the Arch Linux wiki pages are invaluable!)
- Loïc Pefferkorn’s very thorough blog post on setting up Arch Linux with encryption.
- Phil Plückthun’s blog post on the same topic.
Presumptions
This “guide” makes a number of presumptions about your setup and installation goal:
- You will be setting up a dual-boot whereby you can still boot into OS X if need be. I recommend this, even if you’re not going to be using OS X at all, because right now (and likely for the foreseeable future) the only way to get firmware updates installed on your machine will be via OS X. As there have been Linux kernel–MacBook Pro firmware compatibility issues in the past fixed by OS X updates (e.g., try searching “ACPI interrupt gpe66 MacBook hot” and you’ll see a good example).
- I assume you have already repartitioned your drive giving you plenty of free space for Arch. In my 500GB drive, I left 80GB for OS X (probably much more than really necessary) and the rest I left free for Arch.
Finally, here is the setup I’m installing on:
- Late-2013 MacBook Pro (MacBookPro11,1)
- 13.3" Retina display (2560x1600 resolution; 227dpi)
- Intel Core i5 @ 2.6GHz
- 8GB RAM
- 512GB SSD
- Intel Iris Graphics
- 720p FaceTime HD Camera (currently not supported by Linux kernel; follow this GitHub project)
Getting the Installation Media
First, we need to get Arch. Go here to download it: https://www.archlinux.org/download/
I usually go with the torrent option. It does seem to be the fastest.
Next, we’re just going to make sure the download went OK; it wasn’t corrupted,
tampered with, or anything like that. Fire up the terminal and cd into the
directory where the downloaded ISO is at. Run the following:
sha1sum XXXX.iso
Where XXXX is the correct name of the ISO you downloaded.
Next, check the signature. This assumes you have GnuPG installed on your
system. On the download page, there is also a link under “Checksums” to get the
PGP signature as a .sig file. Download that, ideally into the same directory
as your Arch ISO. Run:
gpg --verify XXXX.iso.sig
You’ll probably get some error about the public key not being found. Copy that public key and run this:
gpg --recv-keys YYYY
Where YYYY is that public key you just copied. Run the previous gpg command
again, and it should verify it now alright.
Now we’re ready to get that ISO onto a USB drive so we can boot the computer
from it. Before inserting the thumb drive, run lsblk and take note of the
drives listed. Insert the drive and run lsblk again. Take note of the third
letter in the sdx of the thumb drive. Be sure to unmount the thumb drive:
umount /dev/sdx
Next, run the following to copy the ISO to the USB drive:
dd if=/path/to/arch.iso of=/dev/sdx bs=4M
After that’s run, it should be all set to go. If you’re using OS X to create
the installation media, the steps will be the same, but some of the commands
will be different. You’ll use diskutil list instead of lsblk, diskutil unmount /dev/diskX to unmount the drive, and use the flags bs=1m and
of=/dev/rdiskX (note the ‘r’) when running dd.
With the USB drive plugged in, restart the MacBook and hold down the option/alt key. Right at boot time a screen should pop up with your boot options. Your USB drive should be one of the options. Pick it along with the first option the following boot screen lists. Now you should be at the Arch live install prompt.
Doing the Base Installation
On the HiDPI (Retina) display of my MacBook, the prompt is really small. Set
the font using setfont sun12x22 to get a more comfortably sized font on the
display.
Internet
You’ll need a working Internet connection to do the install. I have an ethernet-USB adapter that I use. That’s the easiest way as it works out of the box without any fiddling with wireless drivers (which we’ll deal with later).
With the adapter plugged in, make sure it’s working by pinging Google:
ping -c 3 www.google.com
You should get a response that all three packets were sent and received.
System Clock
The system clock should be just fine. The general Arch wiki recommends ensuring the system clock is accurate, and I’ve found it doesn’t seem to break anything. So, I run it:
timedatectl set-ntp true
Partitioning the Drive
Now comes the tricky part, or at least the part I’m most scared of screwing up: partitioning the drive. This will destroy data on the disk, so please do be careful.
As mentioned earlier, I assume the drive has free space available to make the installation. Apple uses the GUID Partition Table (GPT), and we’re going to keep that partition table. I’ve used parted before to do partitions (and it handles both MBR and GPT partition styles), but cgdisk is nice. Start cgdisk:
cgdisk /dev/sdx
At the end of the partition table should be the free space you already created. With that, we’re going to create a new partition. You just need to make one partition; we’re going to break it up later after the encryption is setup.
I added 128MB between the last partition and my new partition because of this explanation by Apple.
You’ll want to use Linux LVM (8e00) as the partition type id. The final partition table will look something like this:
Part. #     Size     Partition Type    Partition Name
-----------------------------------------------------
           3.0 KiB   free space
1        200.0 MiB   EFI System        EFI System Partition
2         74.5 GiB   Apple HFS/HFS+    Macintosh HD
         128.0 MiB   free space
3        391.1 GiB   Linux LVM         ArchLinux
Getting Encryption and LVM Setup
You’ll want to make note of the partition number you just created. For me it’s
partition 3, and the drive is sda, so my Arch Linux partition can be found at
/dev/sda3.
We’re going to encrypt /dev/sda3 using DM-Crypt and then the LVM partitions
are going to be created over that LUKS encryption layer. So, it’s called “LVM
on LUKS.” Both LUKS encryption and LVM support are provided by the Linux
kernel, so it should be well supported and maintained (ideally).
(NB: This will just encrypt the system /root and /home directories. The /boot
directory will not be encrypted because we’re going to use the /boot partition
that’s there. That’s /dev/sda1 in my partition table above.)
OK, let’s get the partition encrypted:
cryptsetup -v luksFormat /dev/sdxY
The -v flag is for verbosity. This will give all the other setup flags their
default values. As of writing this, doing the above command is the equivalent
of running this:
cryptsetup -v --cipher aes-xts-plain64 --key-size 256 --hash sha1 --iter-time 1000 --use-random --verify-passphrase luksFormat /dev/sdxY
Enter in a good passphrase (twice), and we should be good to go.
Now with the encryption setup, we’re going to create the necessary volumes and filesystems within the LVM.
First, let’s open up our encrypted partition:
cryptsetup luksOpen /dev/sdxY lvm
This is going to map our encrypted device (/dev/sda3 in my case) to
/dev/mapper/lvm. Now we’re going to create the physical and logical volumes
for the root and user directories. I gave the root directory 40GB (hopefully
enough for all my programs and whatnot. As of writing this, and with a full
install, I’m using 10GB on my / directory. So, I think I’m good.
Create the physical volume:
pvcreate /dev/mapper/lvm
Now create the volume with the name vgcrypt:
vgcreate vgcrypt /dev/mapper/lvm
We’re ready to create the logical volumes now (40GB for root and the rest for users’ home):
lvcreate --size 40G --name root vgcrypt
lvcreate --extents +100%FREE --name home vgcrypt
We now have our two volumes vgcrypt-root and vgcrypt-home. They need to be
formatted to a particular filesystem. I’ve been happy with ext4.
mkfs.ext4 /dev/mapper/vgcrypt-root
mkfs.ext4 /dev/mapper/vgcrypt-home
If all’s gone OK, we should be able to mount our newly created partitions. Make
sure to mount the root partition first so we can create the /home directory
inside of it for the home partition:
mount /dev/mapper/vgcrypt-root /mnt
mkdir -p /mnt/home
mount /dev/mapper/vgcrypt-home /mnt/home
And with that, Arch is ready to be installed on the disk.
Select a Mirror
This step can optionally be skipped, but I like to choose a US server just in case it might be faster. Open up the mirrorlist:
vi /etc/pacman.d/mirrorlist
Delete or comment out all the servers except one or two in the US that seem good.
Install the Base System
OK, let’s actually install Arch now:
pacstrap -i /mnt base base-devel
The -i flag asks for confirmation before installing packages. I like using it
just so I can see what’s being installed. (After all that’s part of the reason
for using GNU/Linux, right? To know what’s being installed on your system.)
Generate the fstab
If all went according to plan, Arch is now installed. Before changing into our installation, though, we need to tell the system where to find the filesystems we created earlier for root and home directories.
While it’s normally a good idea to use UUIDs to find disks, we’re going to use labels. This is because our encryption setup generates random IDs for the disks when they’re decrypted. Let’s create the fstab file:
genfstab -L -p /mnt >> /mnt/etc/fstab
The -L flag will generate the fstab file with labels instead of UUIDs. The
-p flag prevents pseudo-filesystems from being added.
Always check the generated fstab:
cat /mnt/etc/fstab
It should look something like this:
#
# /etc/fstab: static file system information
#
# <file system>             <dir>  <type>  <options>                       <dump>  <pass>
# /dev/mapper/vgcrypt-root
/dev/mapper/vgcrypt-root    /      ext4    discard,rw,relatime,data=ordered    0 1

# /dev/mapper/vgcrypt-home
/dev/mapper/vgcrypt-home    /home  ext4    discard,rw,relatime,data=ordered    0 2
If the discard option isn’t there, vi into the fstab file and add it. It’s
used for SSD hard drives.
Configure Our New System
We’re now ready to configure our new system. Let’s change root into it:
arch-chroot /mnt /bin/bash
Set our system locale. Because I also use Thai, I like to generate the locale
for it, too. I’m actually not sure if this is the proper way or not, but oh
well. Uncomment the following from /etc/locale.gen:
...
#en_SG ISO-8859-1
en_US.UTF-8 UTF-8
#en_US ISO-8859-1
...
#tg_TJ KOI8-T
th_TH.UTF-8 UTF-8
#th_TH TIS-620
...
Now generate the locales:
locale-gen
Make English UTF-8 the default:
echo LANG=en_US.UTF-8 > /etc/locale.conf
We want the font change we made at the beginning for the console to also be the font in our new system installation:
vi /etc/vconsole.conf
FONT=sun12x22
Set our timezone accordingly. (I live in Chicago.):
ln -sf /usr/share/zoneinfo/America/Chicago /etc/localtime
And set the time to the standard UTC:
hwclock --systohc --utc
Because we’ve encrypted our root disk, we need to make sure the kernel loads
the proper modules to decrypt it on startup. Otherwise we won’t be able to boot
into our installation. vi into /etc/mkinitcpio.conf and add the necessary
hooks so the HOOKS line looks like this:
HOOKS="base udev autodetect modconf block consolefont encrypt lvm2 filesystems keyboard fsck"
Now we need to regenerate the initramfs image:
mkinitcpio -p linux
So that Internet will work on reboot, we need to enable the dhcpcd service. We’re going to keep using the ethernet-USB adapter for right now. We’ll get wireless setup later.
Get the name of the ethernet interface:
ip link
It should be enp-something. With that, enable the service:
systemctl enable dhcpcd@INTERFACE.service
Finally, let’s configure the machine’s hostname. You can change arch_mbp to
whatever:
echo arch_mbp > /etc/hostname
Add this hostname to the list of hosts. vi into /etc/hosts and edit so it
looks something like this:
#
# /etc/hosts: static lookup table for host names
#

#<ip-address>   <hostname.domain.org>   <hostname>
127.0.0.1   localhost.localdomain   localhost   arch_mbp
::1     localhost.localdomain   localhost   arch_mbp

# End of file
Boot Loader
Now we need to let the boot loader know where to find our new Arch Linux installation. Gummiboot is a nice, simple boot loader. Let’s install it:
pacman -S gummiboot
mkdir -p /boot/loader/entries
Setup the loader to default to arch and set the number of seconds to timeout in
the file /boot/loader/loader.conf:
default arch
timeout 3
Make sure the correct boot partition (/dev/sda1 in my case) is mounted on
/boot by running:
findmnt /boot/
-------------------------
TARGET SOURCE    FSTYPE OPTIONS
/boot  /dev/sda1 vfat   rw,relatime,fmask=0022,dmask=0022,codepage=437,iocharset=iso8859-1,shortname=mixed,err
Now we’re going to create an entry called /boot/loader/entries/arch.conf that
looks like this:
# /boot/loader/entries/arch.conf

title   Arch Linux
linux   /vmlinuz-linux
initrd  /initramfs-linux.img
options cryptdevice=/dev/sda3:vgcrypt:allow-discards root=/dev/mapper/vgcrypt-root rw
Check the boot tree with tree /boot/ (If tree isn’t installed, install it
with pacman -S tree). It should look something like this:
/boot/
├── EFI
│   ├── APPLE
│   │   └── EXTENSIONS
│   │       └── Firmware.scap
│   ├── Boot
│   │   └── BOOTX64.EFI
│   └── gummiboot
│       └── gummibootx64.efi
├── initramfs-linux-fallback.img
├── initramfs-linux.img
├── loader
│   ├── entries
│   │   └── arch.conf
│   └── loader.conf
└── vmlinuz-linux
Now we can install gummiboot:
gummiboot install
An Alternative Boot Loader Method
There are lots of suggestions floating out in the Interwebs about using rEFIt or rEFInd or some bootloaders like that for Macs. Perhaps with older Macs that’s necessary, but the default EFI bootloader on my MacBook seems to recognize Linux just fine. I’ve installed gummiboot on the original /boot partition, following Loïc Pefferkorn’s blog.
However, in previous GNU/Linux installations, I didn’t want to mess with my default /boot partition. So, I actually created a third partition (in addition to the /root and /home partitions) as a /boot partition (but I didn’t encrypt that one—I didn’t feel like dealing with that mess of decrypting before starting the boot sequence).
That worked fine. Most GNU/Linux installations will install gummiboot or GRUB
on the /boot partition you create for it. When you boot up, you can hold down
the alt/option key to go to Apple’s boot image selection screen. Your Linux
/boot drive should show up there. You can also later use efibootmgr to set it
so Linux will be the default.
Reboot into New Installation
Before rebooting, set the root password:
passwd
Let’s leave the chroot environment we used for the install:
exit
You can umount and close the encrypted volume:
umount -R /mnt
cryptsetup close vgcrypt
It’s not a bad idea to just double check the encryption to make sure it opens and mounts properly:
cryptsetup open /dev/sdxY vgcrypt
mount /dev/mapper/vgcrypt /mnt
If all goes accordingly, you can unmount and close the encryption again. And …
reboot
Setting Up Users
On reboot you should be greeted with the gummiboot menu. After selecting Arch (or waiting for it to timeout), you should be prompted for your password to decrypt the drive, and then it should boot into the console.
The first thing I like to do is create a new user and set the user’s password so I’m not operating as root:
# useradd --create-home --groups wheel --shell /bin/bash michael
# passwd michael
This will create the user michael, add him to the group wheel, create a home
directory under /home/michael/ and make his default shell bash (I prefer
fish, but I’ll change that later).
I still need to run as root, though. Because I’ve added michael to the group wheel, I can grant the wheel group sudo privileges. Run:
# visudo
And uncomment the following line so it looks like so:
%wheel ALL=(ALL) ALL
Now you can exit out of your root installation and login under the user you just created.
A note about commands: You may have noticed that the commands I’ve written
above after rebooting have been prefixed with a #. Now that we’re dealing
with a mixed-user environment, that symbol means you’ll need to be root or have
escalated privileges to run the command. If you’re not logged in as root (and
hopefully you aren’t), you’ll need to prefix all the commands beginning with
# with sudo. If I begin a command with $, that means a regular,
non-sudoer user can run it.
Get Your AUR Helper Up and Running
We’re now going to be installing a bunch of things. At the beginning here, most
everything will be included in Arch’s repositories. As time goes on, though,
we’ll need to install some packages from the user-supported AUR. You can
maintain AUR package installations manually, but I like a helper to help me
manage them. I use yaourt
because it’s easy to install, takes the same optional flags as pacman, and
has done me well so far.
You need to use the “official” and manual way of installing AUR packages to get
yaourt installed. It also requires package-query from the AUR, so we’re going
to install that first.
I like to create a directory in my home folder just for building things. (Make sure you’re in your home folder first.)
$ cd ~
$ mkdir Dev
$ cd Dev
Now we’re going to download the package-query package, unarchive it, and
change into its directory:
$ curl -L -O https://aur.archlinux.org/cgit/aur.git/snapshot/package-query.tar.gz
$ tar -xvzf package-query.tar.gz
$ cd package-query
Within the package’s folder, we’re going to run the following to build it:
$ makepkg -s
This will run as your regular user only asking you for your root password if necessary.
With the package made, we can install it via pacman:
# pacman -U package-query-1.6.2-1-x86_64.pkg.tar.xz
Now we’ll do the same for yaourt:
$ cd ~/Dev
$ curl -L -O https://aur.archlinux.org/cgit/aur.git/snapshot/yaourt.tar.gz
$ tar -xvzf yaourt.tar.gz
$ cd yaourt
$ makepkg -s
# pacman -U yaourt-1.6-1-any.pkg.tar.xz
From now on you can use pacman and yaourt interchangeably … for the most
part. yaourt will install Arch repository packages and AUR packages.
pacman, though, will only install Arch repository packages.
Let’s Get a GUI
While I’ve grown to love the console more and more, a graphical interface is nice. In this section, we’re going to get X, Cinnamon, and various GUI applications up and running, along with wireless.
I tend to lump pacman installations into pseudo-groups. I don’t really know
why; I just do it this way. You could probably do one huge pacman -S if you
wanted it, but I’ll break it up a bit.
X and Video Drivers
As this is going to be a graphical interface, we need are graphics card up and running with the proper drivers. Luckily this machine uses Intel graphics, and Intel is pretty good about providing Linux (and sometimes open-source) drivers.
# pacman -S xf86-video-intel mesa-libgl libva-intel-driver libva
The -S flag tells pacman to install the subsequent packages listed. (Again,
you can use yaourt if you’d like here.) This will install the Intel video
driver, the Mesa OpenGL graphics library, and video acceleration API for Intel.
It’ll likely ask you to install additional dependencies. Get all the
dependencies!
With the necessary drivers installed, we can get Xorg (or the X Window System) installed.
# pacman -S xorg-server xorg-server-utils
I like to install the utilities, too, because there are at least a couple I’ll use later (either in this guide or another) that are helpful in improving HiDPI support for the MacBook’s Retina display.
Touchpad Support
You’ll probably want to use your MacBook’s touchpad when you have a GUI. The simplest driver is the synaptics driver:
# pacman -S xf86-input-synaptics
The following config at /etc/X11/xorg.conf.d/50-synaptics.conf works well for
me:
Section "InputClass"
    MatchIsTouchpad "on"
    Identifier      "touchpad catchall"
    Driver          "synaptics"
    # 1 = left, 2 = right, 3 = middle
    Option          "TapButton1" "1"
    Option          "TapButton2" "3"
    Option          "TapButton3" "2"
    # Palm detection
    Option          "PalmDetect" "1"
    # Horizontal scrolling
    Option "HorizTwoFingerScroll" "1"
    # Natural Scrolling (and speed)
    Option "VertScrollDelta" "-90"
    Option "HorizScrollDelta" "-90"
EndSection
Alternatively, there is the mtrack driver that I’ve been playing around with a bit. It’s newer and there’s definitely some kinks that still need to be worked out: scrolling isn’t particularly smooth, palm detection can be a bit spotty, and tapping can sometimes not register, but it does have multi-touch if you care about that. If you want to give it a try, install this instead of the synaptics driver:
$ yaourt xf86-input-mtrack
This is the current state of my config file for it at
/etc/X11/xorg.conf.d/10-mtrack.conf:
Section "InputClass"
    MatchIsTouchpad "on"
    Identifier      "Touchpads"
    Driver          "mtrack"
    Option          "AccelerationProfile" "2"
    Option          "ConstantDeceleration" "2.5"
    Option          "AdaptiveDecleration" "3.0"
    Option          "Sensitivity" "0.6"
    Option          "FingerHigh" "5"
    Option          "FingerLow" "1"
    Option          "ThumbSize" "30"
    Option          "PalmSize" "40"
    Option          "IgnoreThumb" "true"
    Option          "IgnorePalm" "true"
    Option          "DisableOnPalm" "true"
    Option          "DisableOnThumb" "false"
    Option          "TapButton1" "1"
    Option          "TapButton2" "3"
    Option          "TapButton3" "2"
    Option          "TapButton4" "0"
    Option          "ClickFinger1" "1"
    Option          "ClickFinger2" "3"
    Option          "ClickFinger3" "2"
    Option          "ButtonEnable" "true"
    Option          "ButtonMoveEmulate" "true"
    Option          "ButtonIntegrated" "true"
    Option          "ButtonTouchExpire" "0"
    Option          "BottomEdge" "20"
    Option          "SwipeLeftButton" "9"
    Option          "SwipeRightButton" "8"
    Option          "SwipeUpButton" "0"
    Option          "SwipeDownButton" "0"
    Option          "SwipeDistance" "1000"
    Option          "GestureWaitTime" "0"
    Option          "ScrollDistance" "50"
    Option          "ScrollUpButton" "5"
    Option          "ScrollDownButton" "4"
    Option          "ScrollLeftButton" "7"
    Option          "ScrollRightButton" "6"
    Option          "TapDragEnable" "false"
    Option          "TapDragTime" "0"
    Option          "MaxTapTime" "150"
EndSection
Display Manager
Now we need a display manager, which will ease the login process, manage sessions, and automate the starting/stopping of the X server. They’re very handy things. GDM, the GNOME Dispaly Manager, has the best HiDPI support out of the box I’ve seen. But it’ll make you install the entire GNOME desktop environment. I don’t want that. There’s MDM, the Linux Mint display manager, which is a fork of GDM 2. However, I haven’t had a lot of luck with it on Arch. The default config file doesn’t seem very sane, and I haven’t had the time to really pick through it and really understand.
So … I go with LightDM. You can tweak it easily enough to be decent on the Retina display. It’s fast and seems to do a great job at its tasks.
# pacman -S lightdm lightdm-gtk-greeter
And now the first foray into systemd. We also need to enable LightDM so it’ll automatically start next time we boot up.
# systemctl enable lightdm.service
Desktop Environment
It’s time to get Cinnamon installed. Simply run the following:
# pacman -S cinnamon
That’ll pull in a lot more dependencies, too. Gotta get them all!
Some GUI Applications
That’s really all you need. If you reboot again, you should be greeted with LightDM’s login screen. Logging in will take you to the Cinnamon desktop.
However, before doing that I like to install a few more things while I’m at it. First is several applications that I know I’ll be using right off the bat.
# pacman -S firefox thunderbird gedit xfce4-terminal filezilla libreoffice-fresh
I’ll leave it at that for now. That should draw in a lot more dependencies that will be handy to have.
I also like installing fonts now so they’ll be available for me right away to start customizing the interface. These are my favorites:
# pacman -S ttf-dejavu ttf-droid ttf-fira-mono ttf-fira-sans ttf-liberation ttf-linux-libertine-g ttf-oxygen ttf-tlwg ttf-ubuntu-font-family
Note the ttf-linux-libertine-g and not ttf-linux-libertine. You need the
graphite version of Linux Libertine to work with LibreOffice. I won’t go into
here why that’s the case.
I also like Google’s Noto font for the interface, but it’s only available via the AUR:
$ yaourt ttf-noto
Changing User’s Shell
As mentioned earlier, I prefer the fish shell over bash. So, let’s install that:
# pacman -S fish
We can now make that the default shell for the current user (michael):
$ chsh --shell /usr/bin/fish
The next time we login, our shell should be fish instead of bash.
Getting Wireless Working
Before rebooting into our lovely new GUI, let’s get wireless setup to work when we reboot.
This particular machine has the Broadcom BCM4360 wireless chipset. Broadcom has
been pretty mixed in the FLOSS support it seems. The BCM4360 is not supported
by the kernel itself, so we’ll need to use Broadcom’s non-free, non-open
driver: broadcom-wl. I actually don’t think this even officially supports the
BCM4360 chipset, but it works well enough. We’ll need to install the AUR
package:
$ yaourt broadcom-wl
And activate the kernel module:
# modprobe wl
NB: If you update to a newer kernel in the future, you may need to
uninstall and reinstall the broadcom-wl package so it updates with the new
linux-header.
Cinnamon (unlike GNOME) does not automatically start the necessary services for wireless to work on startup. (It took me a long time to figure that out.) So, we need to stop the dhcpcd service we were using for the ethernet and start the Network Manager service. Keeping both running can cause conflicts.
# systemctl disable dhcpcd.service
# systemctl enable NetworkManager.service
Done!
Now when you reboot, you should be all set to go start customizing to your heart’s content, adding applications as you’d like, and playing around with your new Arch Linux box with Cinnamon.
Fine-tuning Power Settings
Another thing I’m often trying to get just right are the power settings. I’ve seen several things online and have tried many of the suggestions. Some worked, some didn’t. Here’s what I ended up using.
I should note that this still isn’t perfect. My MacBook definitely runs cooler now, and battery life seems a bit better. I usually get about 6 hours on a charge. On OS X I got about 8, so it’s not too bad. Still room for improvement, though.
One thing that doesn’t work very well now is suspend. It seemed to work just fine before all my power setting tunings, so I imagine something is getting flagged and restarted when the system tries to suspend and is preventing it. I just haven’t figured out what that is yet.
One more thing: If you Google MacBook Pro and Arch Linux you’ll probably read some things about disabling ACPI interrupts that were causing overheating and high CPU usage. If you have updated to the latest version of OS X 10.10 “Yosemite” then you should be OK. The interrupt gpe4e still is a little high for me, but disabling it seemed to cause issues when closing the lid so I’ve left it as is.
Powertop
The first tool I use is powertop:
$ yaourt powertop
You may want to put your laptop on battery power and calibrate powertop:
# powertop --calibrate
That’ll cause the screen to blackout from time to time. Just let it run. It takes a few minutes then your screen will come back on.
You can create a systemd service that will start powertop’s autotune settings on startup.
# /etc/systemd/system/powertop.service

[Unit]
Description=Powertop tunings

[Service]
Type=oneshot
ExecStart=/usr/bin/powertop --auto-tune

[Install]
WantedBy=multi-user.target
And enable it to automatically start at boot time:
# systemctl enable powertop.service
Thermald
Intel provides a daemon that will keep tabs on the CPUs’ temperature and adjust settings to keep it from getting too hot.
$ yaourt thermald
# systemctl enable thermald.service
Cpupower
Another utility that will help with CPU frequency scaling is cpupower:
$ yaourt cpupower
While the CPU in my machine is 2.6GHz, it can turbo up to 3.1GHz. The Linux
kernel seems to like to ramp it up to 3.1Ghz even when idling. I don’t know
why. So, I’ve used cpupower to limit the CPU’s max speed. My cpupower config
file at /etc/default/cpupower has the following two lines uncommented:
governor='powersave'
max_freq="2.6GHz"
Fan Control
Finally, the kernel doesn’t seem to have very fine control over the MacBook’s fan. The following script helps add fine-tuning for the fan that will increase its baseline speed and ramp it up gently, so it’s not an all-or-nothing kind of setup.
$ yaourt mbpfan-git
# systemctl mbpfan.service
By default the service runs in verbose mode which adds tons of output to the
system journal. It basically works by measuring the CPU temp, adjusting the fan
speed accordingly, and then sleeping for a given number of seconds. With
verbose mode on, it logs its wakeup every few seconds. That means a lot of
writing to the journal. So I changed the service under
/usr/lib/systemd/system/mbpfan.service so the following line reads like so:
ExecStart=/usr/sbin/mbpfan -f
HiDPI (Retina) Support
For the most part things work pretty well, especially any GTK+ 3 applications. There are just a couple things I’ve tweaked to make more applications better DPI-aware.
X Server
First is getting the X Server to be aware of the higher DPI. If you run the following (this is why I installed xorg-server-utils earlier):
$ xdpyinfo | grep -B 2 resolution
You’ll probably see that the resolution is set to 92x92 dots per inch. That’s
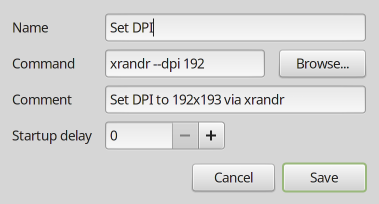
not right! You can force a higher DPI using xrandr. I just have Cinnamon run
it as a startup application. Under System Settings > Startup Application click
Add and create a startup application like this:
Qt 5
While GTK+ 3 applications work fine, there’s not much to be done about GTK+ 2 programs. The story is similar with the Qt framework. Qt 4 applications will generally adjust the font size accordingly, but icons will be really tiny. Mendeley is a good example of this.
With Qt 5, though, you can do some extra tweaking. Create a file called
/etc/profile.d/qt-hidpi.sh and put the following line in it:
export QT_DEVICE_PIXEL_RATIO=2
LightDM
You can at least increase the font size of the LightDM login screen by
uncommenting and editing the following line in
/etc/lightdm/lightdm-gtk-greeter.conf:
xft-dpi=192
LibreOffice
In the latest release of LibreOffice (version 5.0), they updated the renderer
they used. This seems to make the icons and text blurry while in previous
versions it was fine. You can default to the GTK backend by editing
/etc/profile.d/libreoffice-fresh.sh and uncommenting the line:
export SAL_USE_VCLPLUGIN=gtk